Setting Up Your First Node.js Application Step-by-Step
If you want to become a backend developer, Node.js is one of the best technologies to learn.
With Node.js, you can:
Build servers
Create APIs
Work with databases
Build real-time applications
Use JavaScript outside the browser
In this article, we’ll set up our very first Node.js application step-by-step.
We’ll cover:
Installing Node.js
Checking installation using terminal
Understanding Node REPL
Creating your first JavaScript file
Running scripts using the
nodecommandWriting a simple Hello World server
Let’s begin.
What Is Node.js?
Node.js is a JavaScript runtime that allows JavaScript to run outside the browser.
Normally, JavaScript runs inside browsers like:
Chrome
Firefox
Edge
But Node.js allows JavaScript to run directly on your computer or server.
This makes backend development possible using JavaScript.
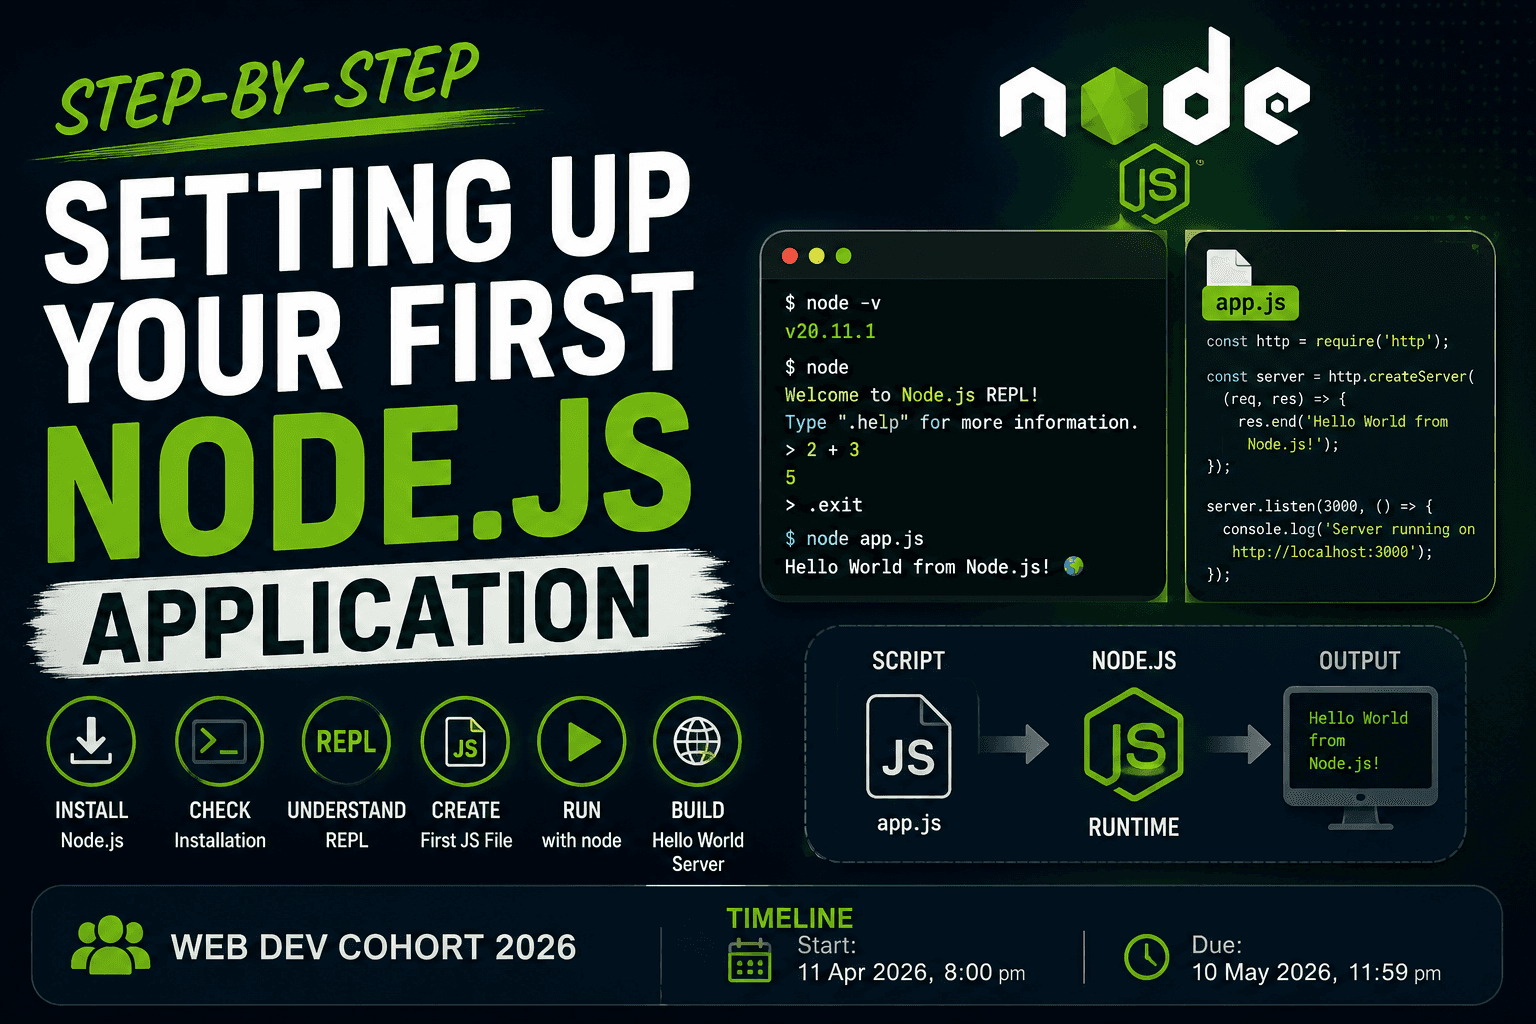
Step 1: Installing Node.js
To use Node.js, first install it on your system.
Download Node.js from the official website:
Install the:
LTS (Long Term Support) version
because it is stable and recommended for beginners.
What Gets Installed?
When you install Node.js, two important things are installed:
| Tool | Purpose |
|---|---|
| Node.js | Runs JavaScript outside browser |
| npm | Package manager for installing libraries |
Step 2: Check Installation
After installation, open your terminal or command prompt.
Run:
node -v
Example output:
v22.0.0
This confirms Node.js is installed successfully.
Now check npm:
npm -v
Example output:
10.5.0
Understanding the Terminal
The terminal is where we run Node.js commands.
Examples:
node app.js
npm install
Backend developers use the terminal very frequently.
Step 3: Understanding Node REPL
REPL stands for:
Read
Evaluate
Print
Loop
It is an interactive environment where Node.js executes JavaScript instantly.
Start REPL by typing:
node
You’ll see something like:
>
Now you can run JavaScript directly.
Example:
2 + 3
Output:
5
Why REPL Is Useful
REPL is great for:
✅ Testing small code snippets ✅ Practicing JavaScript ✅ Debugging quickly ✅ Experimenting with logic
REPL Flow
Write Code
     ↓
Node Executes
     ↓
Result Printed
     ↓
Wait for Next Input
Step 4: Create Your First JavaScript File
Create a folder for your project.
Example:
my-first-node-app
Inside it, create a file:
app.js
Write Your First Node.js Code
Inside app.js:
console.log("Hello Node.js");
This is your first Node.js program.
Step 5: Run the Script Using Node
Open terminal inside the project folder.
Run:
node app.js
Output:
Hello Node.js
Congratulations 🎉
You just executed your first Node.js application.
Node Execution Flow
app.js
   ↓
Node Runtime
   ↓
JavaScript Executes
   ↓
Output Printed in Terminal
Understanding What Happened
When you run:
node app.js
Node.js:
Reads the file
Executes JavaScript code
Prints output to terminal
Simple but powerful.
Step 6: Writing Your First Hello World Server
Now let’s create a basic web server.
Replace the code inside app.js with:
const http = require("http");

const server = http.createServer((req, res) => {
  res.end("Hello World");
});

server.listen(3000, () => {
  console.log("Server running on port 3000");
});
Understanding the Code
Import HTTP Module
const http = require("http");
Node.js has a built-in HTTP module for creating servers.
Create Server
http.createServer()
creates a server.
Handle Request and Response
(req, res)
req→ incoming requestres→ server response
Send Response
res.end("Hello World");
sends data back to the browser.
Start Server
server.listen(3000)
starts the server on port 3000.
Run the Server
In terminal:
node app.js
Output:
Server running on port 3000
Now open browser:
http://localhost:3000
You’ll see:
Hello World
Your first Node.js server is now running.
Server Request Flow
Browser Request
      ↓
Node Server Receives Request
      ↓
Server Sends Response
      ↓
Browser Displays Result
Why This Is Important
This small server is the foundation of backend development.
Every backend application works similarly:
Client sends request
Server processes request
Server sends response
Common Beginner Mistakes
Forgetting to Save File
Always save changes before running.
Wrong File Name
Make sure:
node app.js
matches your actual filename.
Port Already in Use
If port 3000 is busy, try another port:
server.listen(5000)
Practice Assignment
Try these exercises yourself.
1. Install Node.js
Verify installation using:
node -v
npm -v
2. Use REPL
Run:
node
Try:
10 + 20
"Hello".toUpperCase()
3. Create Your Own JS File
Create:
test.js
Print:
console.log("Learning Node.js");
Run it using:
node test.js
4. Modify the Server Response
Change:
res.end("Hello World");
to something custom.
Example:
res.end("Welcome to Node.js");
Final Thoughts
Setting up your first Node.js application is the beginning of backend development.
In this article, you learned:
How to install Node.js
How to verify installation
What REPL is
How to run JavaScript files
How to create a simple server
The key idea is:
Node.js allows JavaScript to run outside the browser.
This opens the door to building:
APIs
Backend servers
Real-time applications
Full-stack projects
Once you are comfortable with basic Node.js setup, you can move toward:
Express.js
Databases
Authentication
REST APIs
and real-world backend systems.
And now, you know how to set up your first Node.js application step-by-step.
If you have any doubt or want to connect, feel free to drop a comment — I’d be happy to help.
Thanks for reading, and see you in the next blog!
Peace ✌️ and Happy Learning!